

Template Support
Heirloom Template Guide
Everything you need to know about the pages and special features included with your Heirloom template.
Start Here
New to customizing your template?
Before diving into the Heirloom-specific features below, start with the Template Setup Guide. It covers everything you need to customize your branding and content, set up your site, prepare your SEO, and get ready to launch.
What's Included
Step inside Heirloom.
Heirloom includes the core pages and layouts you need to build a complete photography website. Customize, rename, or repurpose them to fit your business and services.
SITE PAGES
Home
About
Weddings
Couples
Portraits
Contact
Coming Soon
404
BLOG TEMPLATES
Blog
Single Post
Page
Special Features
How it all works.
Heirloom includes a few interactive features that are already styled and set up for you. The guide below is organized by page, so you can easily find what you need as you customize your content and images.
Site-Wide Features
01 — Desktop + Mobile Elements
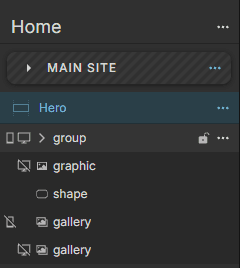
You may notice that some sections in Heirloom contain separate elements for the desktop and mobile layouts. This is intentional and allows certain parts of the design to be arranged differently for each screen size.
Elements that aren’t needed on one layout may be hidden rather than deleted. Before removing an element that appears hidden, check whether it’s being used on the other layout.
A QUICK TIP — In Showit, the crossed-out device icons in the left-hand panel indicate when an element is hidden on desktop or mobile.
Home Page
01 — Clickable Service Links
The Services section on the Home page includes three clickable service items. Each image and its corresponding text are grouped together, with a click action applied to the entire group. This allows visitors to click anywhere on the service item to visit the corresponding service page.
TO UPDATE YOUR LINKS
Select the service group in Showit, then check its Click Actions in the right-hand panel. Update the link so it points to the page that corresponds with that service.
If you rename or repurpose the Weddings, Couples, or Portraits pages, be sure to update these links as well.
A QUICK NOTE — The click action is applied to the group rather than the individual image or text. When editing this section, keep the elements grouped together so the entire service item remains clickable.

02 — Auto-Scrolling Galleries
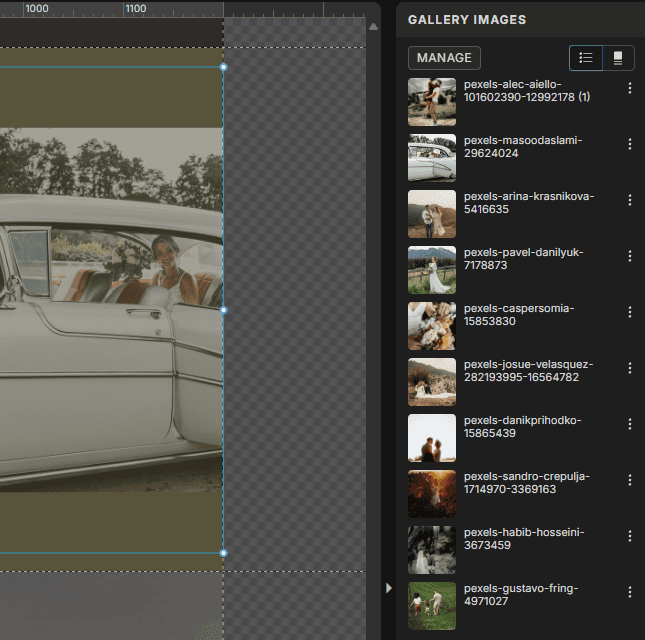
Heirloom includes auto-scrolling image galleries on the Home, Weddings, Couples, and Portraits pages. These galleries are already styled and configured to automatically move through your images, so you can simply replace the existing photos with your own.
TO UPDATE YOUR GALLERY
Select the gallery in Showit, then open Gallery Images in the right-hand panel. From there, you can remove the existing images, upload your own, and drag them into the order you'd like them to appear.
A QUICK NOTE — The gallery's scrolling behavior, spacing, and styling are already set up for you. You shouldn't need to adjust the Gallery Settings unless you intentionally want to change how the gallery looks or moves.
Service Pages
01 — Testimonial Sliders
Heirloom includes testimonial sliders on the Weddings, Couples, and Portraits pages. Each slider contains three testimonials and is built using Canvas Views in Showit, with one testimonial contained in each view.
TO UPDATE YOUR TESTIMONIALS
Select the Testimonials canvas in the left-hand panel. Inside the canvas, you’ll see three Canvas Views: View 1, View 2, and View 3. Each view contains one complete testimonial, including the testimonial text, client name, and image.
Start with View 1 and replace the existing content with your first testimonial. Then move to View 2 and repeat the process with your second testimonial, followed by View 3 for your third.
Working through the views one at a time makes it easier to keep track of which testimonial you’re editing and helps prevent accidentally changing elements in another view.
The arrow buttons are already set up to move visitors between the three Canvas Views, so you don’t need to change their click actions when simply replacing the content.
ADDING ANOTHER TESTIMONIAL
If you’d like to add another testimonial, I recommend duplicating one of the existing Canvas Views and replacing its content rather than creating a new view from scratch. This keeps the placement, spacing, and styling consistent with the other testimonials.
The arrow buttons are already set up to move visitors between the Canvas Views. If you add or remove views, be sure to check that the slider navigation still works correctly.
BACKGROUND OVERLAY
Each testimonial includes two image layers: the background image and a semi-transparent graphic layered over it. The graphic acts as an overlay, adding a subtle color and texture effect to the image.
When replacing the testimonial image, you only need to swap the background image. The overlay can stay in place and will automatically sit over your new photo.
If you prefer the photo without the effect, you can simply delete the overlay graphic from that Canvas View.
A QUICK NOTE — If you remove the overlay, repeat the change in each Canvas View where you want it removed. Each testimonial view contains its own image and overlay.
NEED MORE HELP WITH CANVAS VIEWS?
Showit has a full guide explaining how Canvas Views work and how to edit them.


YOU’RE ALL SET
Now, make it yours.
You know your way around Heirloom and the features built into your template. From here, you can customize it to fit your brand, your work, and your business. And if you need a little help along the way, I’m here.
Need a Little Help?
Contact Support
Your FoxAura template includes 30 days of email support for template-related questions. If you get stuck, have a question, or something doesn’t seem quite right as you customize your site, reach out and I’ll be happy to help.
Want me to take it from here?
Template Customization
Love your template, but don’t want to customize it yourself? I’ll customize your FoxAura template with your brand, content, and imagery and get it ready to launch in just one week.